نوشته شده توسط : twilaeyql88

Are you looking for a scanning tool to replace the old one to run quickly and easy to use? GM MDI 2 will be a good choice for you. Here share the details of MDI2 including features, functions and supported protocols etc.
GM MDI 2 without Wifi Properties Functions Protocol Where to buy-1

OVERVIEW

MDI is an interface between the vehicle DLC and a PC (by wired USB, wired Ethernet, wireless Ethernet) and TIS2 web.
GM MDI 2 without Wifi Properties Functions Protocol Where to buy-2

GM MDI 2 Features:

Works as the high-quality Vauxhall / Opel dealer diagnostic interface
Can be used with Global TIS, GDS 2, Tech2Win software on a new laptop
Provides full dealer level diagnostics and programming
Supports all Vauxhall /Opel 16 pin vehicles from 1996 to 2017
Performs quickly and used easily

GM MDI 2 Functions:

Automatic vehicle recognition
DTC reading and removal
Complete list of live data streaming for all main ECU
Recordable / playback of live data

New software flash for existing ECU to fix drivability issues
Programming and installation of new ECU (PCM, ABS, Instrument cluster, air bag, fuel pumps etc.,)
Programming new keys
Setting / removing speed limiters
J2534 pass thru offering ECU re-flash and diagnostics for other vehicle manufacturers, when subscribed to their specified software
More dealer specific functions

What protocols does the GM MDI 2 Scanner support?

For immediate use- At present, vehicles have two buses on the 16 pin connector
(high speed and low speed GMLAN). The GM MDI communicates using all of the existing GM protocols, the same as the GM Tech2:
– UART
– Class 2
– KWP2000
– GMLAN (CAN)
Beginning with the 2008 model year vehicles, Pass-Thru will be the only programming method available. (Remote will continue to be available for previous vehicle

Where to buy GM MDI 2?
If you would like to buy Multiple Diagnostic Interface 2, click here to get more info: https://www.autonumen.com/goods-6947-GM-MDI-2-Diagnostic-Tool-Multiple-Diagnostic-Interface.html


:: برچسب‌ها: GM MDI2,GM MDI 2,GM MDI 2 Scanner,GM MDI ii Scan tool,MDI 2 GM,GM MDI 2 Diagnostic Tool,gm mdi 2 price,tech 3, ,
:: بازدید از این مطلب : 173
|
امتیاز مطلب : 0
|
تعداد امتیازدهندگان : 0
|
مجموع امتیاز : 0
تاریخ انتشار : چهار شنبه 25 اسفند 1400 | نظرات ()
نوشته شده توسط : twilaeyql88

Nissan Consult III Plus scan tool will be needed to perform the process of reflashing/reprogramming Nissan ECUs. This process works for any computer on any Nissan vehicle and is the same process if you use the factory tool (Nissan Consult) or a J2534 tool.

A Consult3+ clone can be used to flash ECU, but only work on Nissan pre-2016.  For newer Nissans, the reflash file needs to be purchased for the Nissan website and is an extra purchase to the Nissan subscription purchase you also need to make.

On some vehicles you will need to email Nissan to have the file sent to you, these vehicle do not require you to purchase the file but do require the subscription purchase.

Nissan Consult III+  ECU Reflash/Reprogramming Update Procedure

Model example: Nissan Maxima 2016

  • Reprogram ECU
  • Throttle valve closed position learning
  • Idle Air Volume learning
  • Accelerator Pedal Closed position learning
  • Confirmation Start up Engine
  • Erase DTCs
  • Completed

Detail:
Nissan Maxima 2016 ECU Reprogramming by Consult3 Plus-1

Select vehicle information, Go to Measurement Mode

Read Precaution and confirm
Nissan Maxima 2016 ECU Reprogramming by Consult3 Plus-2

Read VIN and confirm
Cumminicating  with vehicle
Nissan Maxima 2016 ECU Reprogramming by Consult3 Plus-3 Nissan Maxima 2016 ECU Reprogramming by Consult3 Plus-4

Select Engine system->Reprogramming
Nissan Maxima 2016 ECU Reprogramming by Consult3 Plus-5

Save operation log
Nissan Maxima 2016 ECU Reprogramming by Consult3 Plus-6

Read and confirm operation procedure
Nissan Maxima 2016 ECU Reprogramming by Consult3 Plus-7

Check vehicle detail information and confirm
Nissan Maxima 2016 ECU Reprogramming by Consult3 Plus-8 Nissan Maxima 2016 ECU Reprogramming by Consult3 Plus-9

Confirm vehicle condition. Remove the terminal caps of the battery and connect battery charger to battery.  Adjust the battery charger output so that the vehicle voltage is between 12.0V and 13.5V.

Confirm the RESULT is ok and confirm vehicle conditions listed on the interface
Nissan Maxima 2016 ECU Reprogramming by Consult3 Plus-10 Nissan Maxima 2016 ECU Reprogramming by Consult3 Plus-11 Nissan Maxima 2016 ECU Reprogramming by Consult3 Plus-12

Transfer data among computer, Nissan Consult 3 plus and vehicle

Reprogramming is completed.
Nissan Maxima 2016 ECU Reprogramming by Consult3 Plus-13

Perform throttle valve closed position learning

Fully release the accelerator pedal. Turn ignition ON and turn off. Then count download of 10 seconds starts.

Make sure throttle value moves during count down of 10 seconds by confirming the operating sound.

Turn Power switch/ignition SW to ON position.
Nissan Maxima 2016 ECU Reprogramming by Consult3 Plus-14

Perform Idle Air Volume learning
Nissan Maxima 2016 ECU Reprogramming by Consult3 Plus-15

Perform Accelerator Pedal Closed position learning
Turn ignition switch to OFF position and hold it for 10 seconds or more

Turn ignition switch to ON position and hold it for 2 seconds or more

Repeat the procedure once or twice

Turn ignition switch to OFF position
Nissan Maxima 2016 ECU Reprogramming by Consult3 Plus-16

Confirmation Start up Engine
Confirm the engine keeps starts and idling normally.

Nissan Maxima 2016 ECU Reprogramming by Consult3 Plus-17

Erase DTCs

Nissan Maxima 2016 ECU Reprogramming by Consult3 Plus-18

The ECU reflash update procedure is completed.


:: برچسب‌ها: nissan consult III plus,nissan consult 3 plus,consult 3 plus,consult iii plus software,Consult-3 Plus,Consult-3 Plus for Nissan,Nissan Consult3 plus, ,
:: بازدید از این مطلب : 168
|
امتیاز مطلب : 0
|
تعداد امتیازدهندگان : 0
|
مجموع امتیاز : 0
تاریخ انتشار : پنج شنبه 12 اسفند 1400 | نظرات ()
نوشته شده توسط : twilaeyql88

How to Install ODIS 4.2.3 And Set up USB/WiFi For VAS 6154

VAS 6154 Driver, Install, USB/WiFi setup

Look here: all details for vas 6154 head (esp. china clone)

vas 6154 driver:

vas 6154 driver download

https://mega.nz/#!8LAikSQK!g05ClEGjMjFG7IwSU3PDBginUHvbckoyJCUlrLUY3sQ

vas 6154 installation:

vas 6154 windows 7: confirmed to work

vas 6154 windows 10: no luck

I will prefer you to use windows 7 for all the diagnostic devices, this is because of the security of the windows 10. The best way to get a good working diagnostic program is to have one and only laptop for this. A clean windows 7 is the best way.

Have a try on Win 7 32 bit and 64. both have the luck

32bit: x86 is soooo much better since there is no any lack of the functionality for any kind of driver of ur laptop , I test both x86 is better and u can install both yes ODIS-S and ODIS-E

64 bit: I installed on win7 64bit and it installed and I added the update file from the download, starts and works very well

vas 6154 usb setup:

There are two VAS 6154 ODIS china version, one with a wireless module and the other without it.

But both come with a USB module.

vas6154 wireless setup:

vas 6154 wifi setup: yes!

vas 6154 bluetooth setup: no!

Vas 6154 china clone CANNOT connected via Bluetooth, but WiFi available for wireless connection

Look here: How to set up vas 6154 wifi:

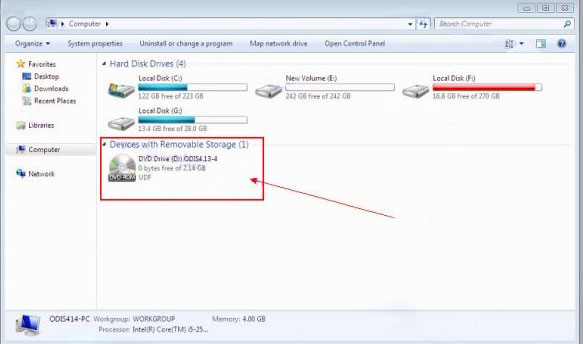
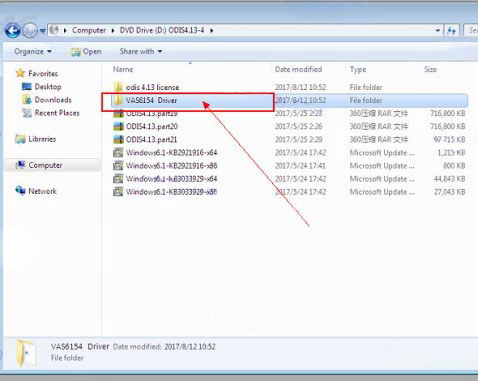
Step1: Input the fourth CD and open it and then install the vas 6154 driver
How to Install ODIS Software And Set up USB WiFi For VAS 6154-1

Step 2: Open the CD and then chose the vas 6154 driver to install
How to Install ODIS Software And Set up USB WiFi For VAS 6154-2 How to Install ODIS Software And Set up USB WiFi For VAS 6154-3

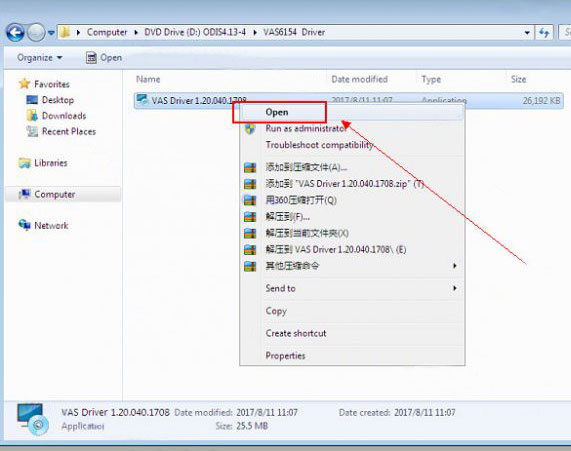
Step 3: After installed and click on the Desktop – symbol
How to Install ODIS Software And Set up USB WiFi For VAS 6154-4
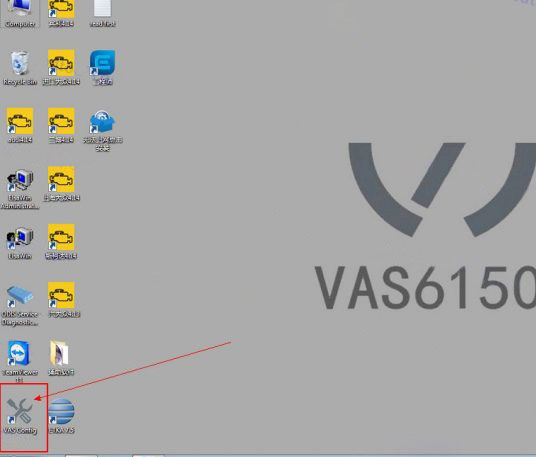
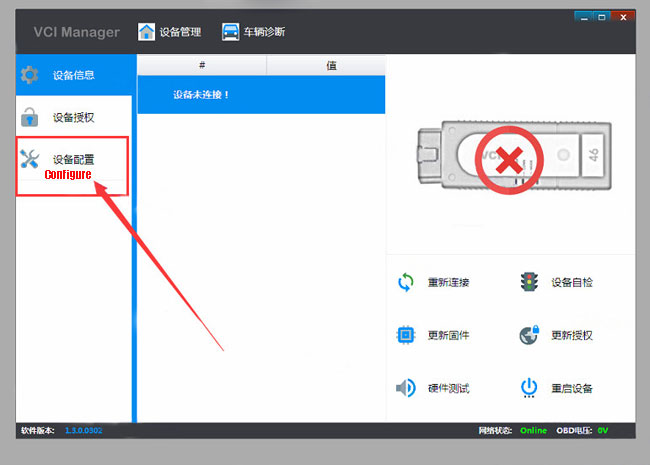
Step 4: Click on the Device Configuration
How to Install ODIS Software And Set up USB WiFi For VAS 6154-5

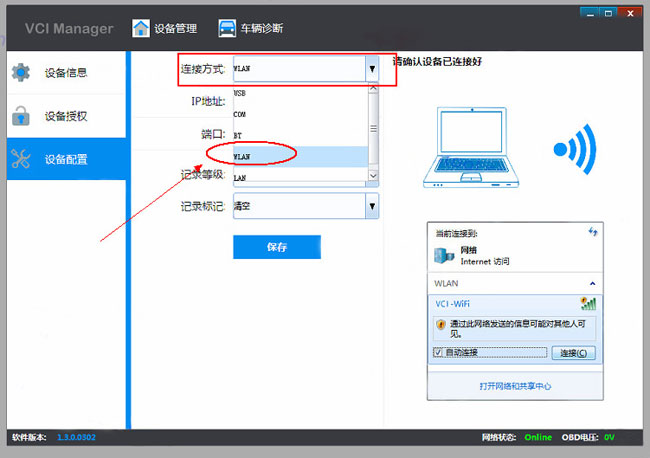
Step5: Choose the connection way “WLAN”
How to Install ODIS Software And Set up USB WiFi For VAS 6154-6

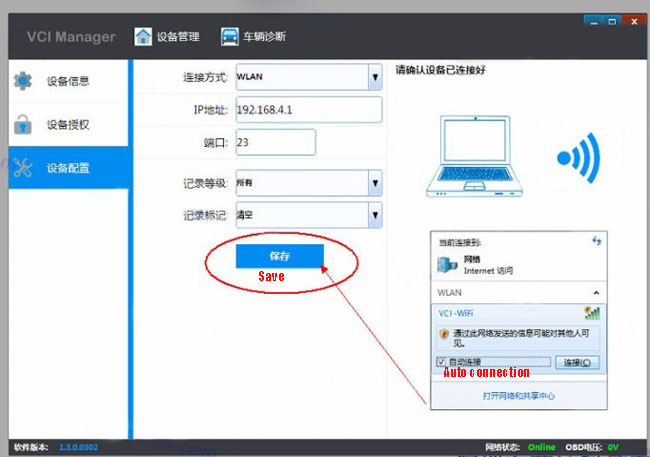
Step 6: Choose the “save”
How to Install ODIS Software And Set up USB WiFi For VAS 6154-7

Step 7: Plug the vas 6154 to the car

Step 8: Open the WIFI and find the VAS-6154 wifi name and connect it.
How to Install ODIS Software And Set up USB WiFi For VAS 6154-8

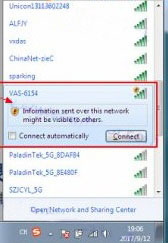
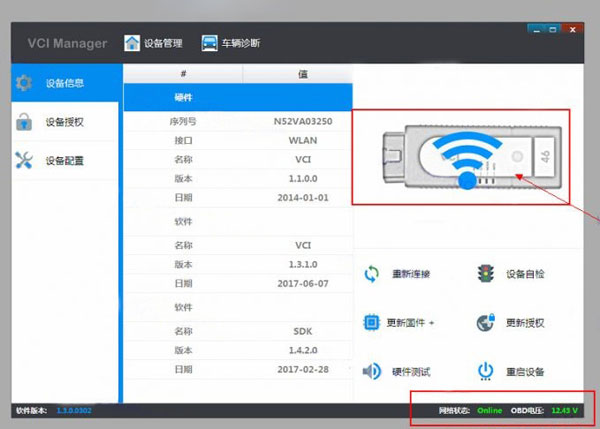
Step 9: It shows Connected
How to Install ODIS Software And Set up USB WiFi For VAS 6154-9

Step 10: The state of connect successfully
How to Install ODIS Software And Set up USB WiFi For VAS 6154-10

Step 11: Open odis software. Now the latest version is 4.4.1
How to Install ODIS Software And Set up USB WiFi For VAS 6154-11

Step 12: VAS 6054 wifi connection setup successfully.
How to Install ODIS Software And Set up USB WiFi For VAS 6154-12

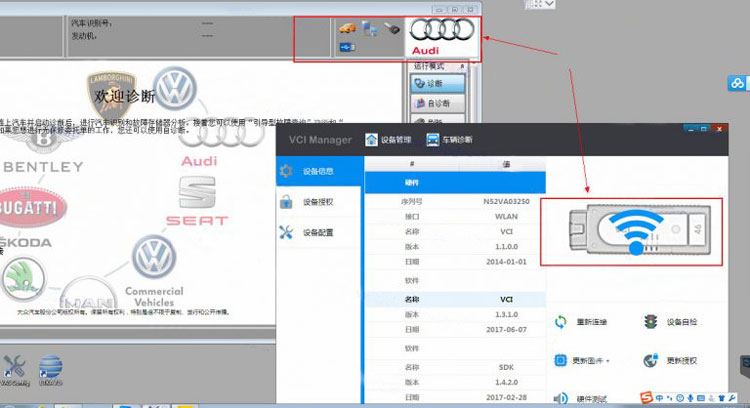
Done! Ready for use!


:: برچسب‌ها: VAS 6154,VAS6154 Diagnostic Tool,VAS 6154 ODIS,VAS6154 ODIS, ODIS Engineering Software, ,
:: بازدید از این مطلب : 178
|
امتیاز مطلب : 0
|
تعداد امتیازدهندگان : 0
|
مجموع امتیاز : 0
تاریخ انتشار : دو شنبه 2 اسفند 1400 | نظرات ()