In the world of luxury vehicles, Porsche has always stood out as a symbol of excellence and innovation. To ensure the highest standards of performance and reliability, Porsche workshops rely on the state-of-the-art diagnostic tool known as the porsche piwis 3 scanner. This third-generation device is an advanced diagnostic system that empowers technicians and mechanics to efficiently diagnose and resolve issues with Porsche vehicles, including the latest 2021 Taycan. Let’s delve into the remarkable features and benefits of this indispensable tool.
The Piwis 3 boasts an impressive array of functions that make it an invaluable asset for any Porsche workshop. From comprehensive diagnostics to guided fault finding, this tool enables technicians to identify and troubleshoot issues swiftly. The actual value/input signal functions ensure accurate readings and precise analysis, while the drive linking/test functions facilitate comprehensive testing of various vehicle systems. With maintenance/repair function groups, coding/programming function groups, and wiring diagram applications, the Piwis 3 provides a comprehensive solution for all diagnostic and repair needs.
One of the key advantages of the Piwis 3 is its compatibility across all Porsche vehicle models, including the latest releases. Whether it’s a classic model or the cutting-edge Taycan, this diagnostic system covers them all. This compatibility ensures that technicians can efficiently address any problem that arises, regardless of the vehicle’s vintage or complexity. Porsche owners can rest assured that their prized possessions will receive the utmost care and attention, thanks to the comprehensive capabilities of the Piwis 3.
With the Piwis 3, Porsche workshops can streamline their operations and deliver exceptional service to their customers. The tool’s logging and filtering functionalities enable technicians to track and analyze data effectively, allowing for accurate diagnosis and resolution. This efficient workflow translates into reduced vehicle downtime and faster turnaround times for repairs. By leveraging the Piwis 3, Porsche workshops can enhance their reputation for quality service and customer satisfaction.
Porsche vehicles are known for their precision engineering, and the Piwis 3 upholds this standard by providing technicians with reliable and accurate diagnostic results. This advanced tool ensures that no issue goes unnoticed, enabling technicians to identify even the most intricate problems. With the Piwis 3, Porsche workshops can confidently tackle any challenge, delivering the highest level of care and ensuring that every Porsche vehicle performs at its best.
The Piwis 3 is undoubtedly an indispensable diagnostic tool for any Porsche workshop aiming to provide top-notch service and repairs. Its advanced capabilities, compatibility with all Porsche models, and seamless workflow integration make it an essential asset for technicians and mechanics. By leveraging the Piwis 3, Porsche workshops can consistently deliver unparalleled vehicle care and maintain the reputation of excellence that the Porsche brand represents.
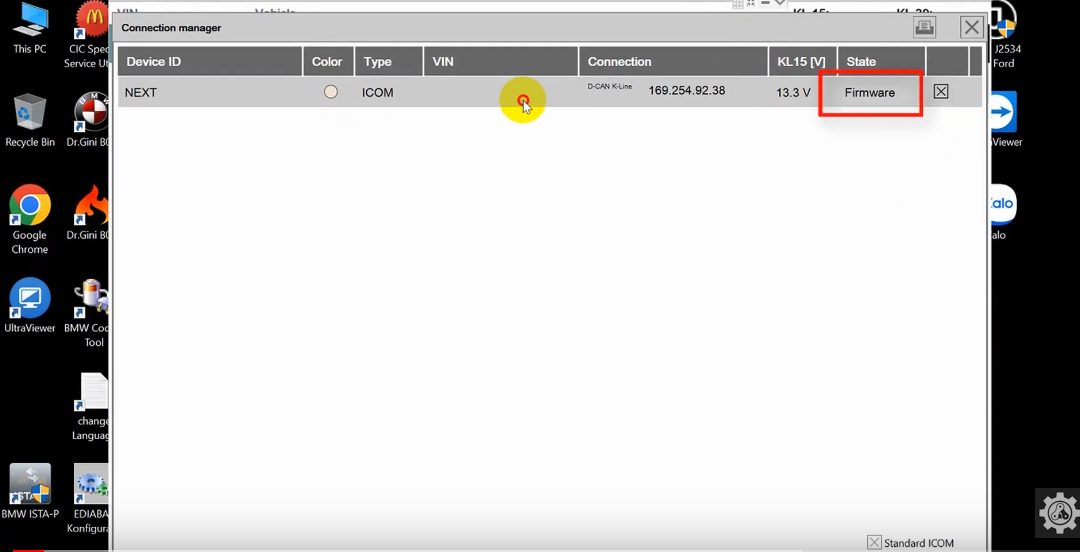
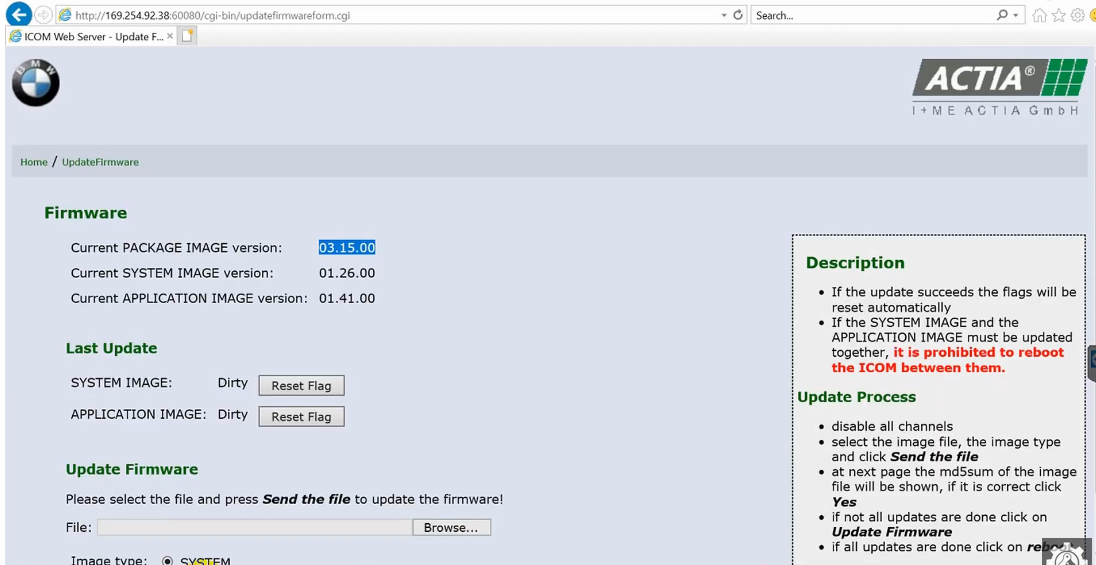
When you update the BMW ISTA diagnostic software and connect to a BMW vehicle, the connection manager will display the firmware and advise that your ICOM needs to be updated. Upgrade to the latest firmware version on your device , Download latest firmware.
ICOM Firmware Update Steps 1. Connect the ICOM to computer by the LAN cable, power 12V to ICOM by the power adapter or car.
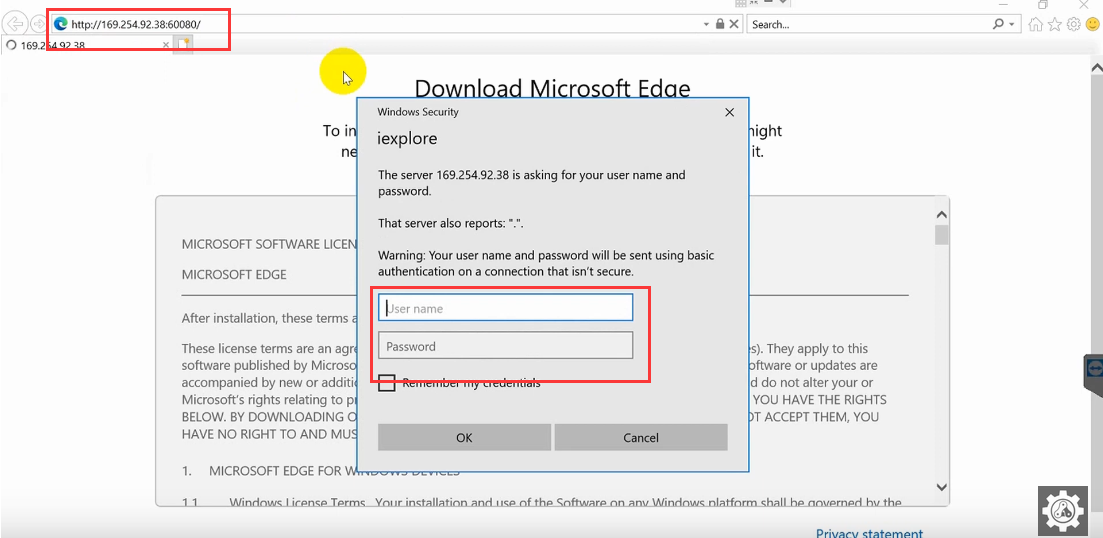
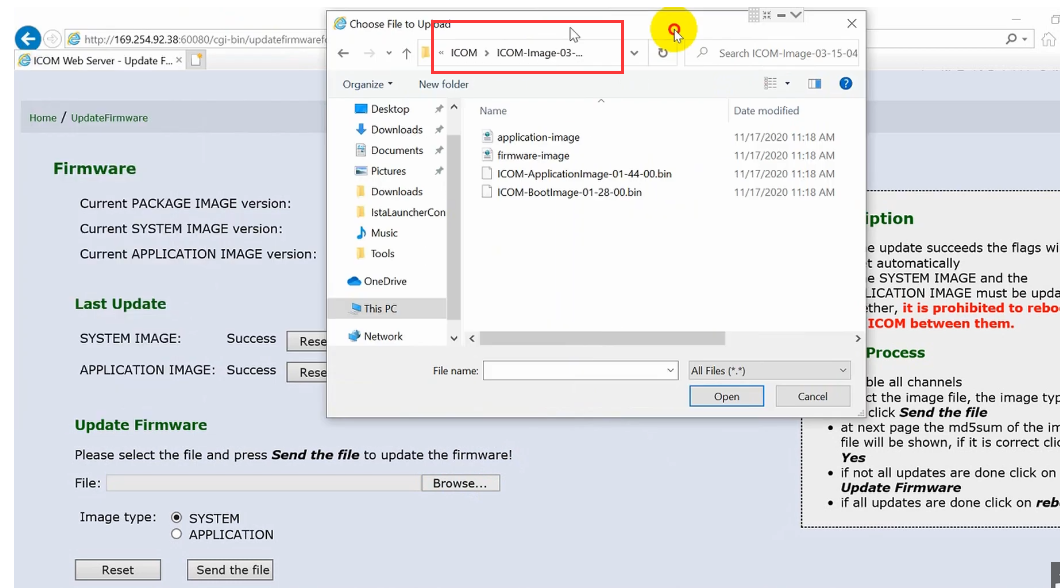
2. Open http://169.254.92.38:60080/ by IE browser (only after ICOM is connected with laptop and power it can be opened), user name: root password: NZY11502
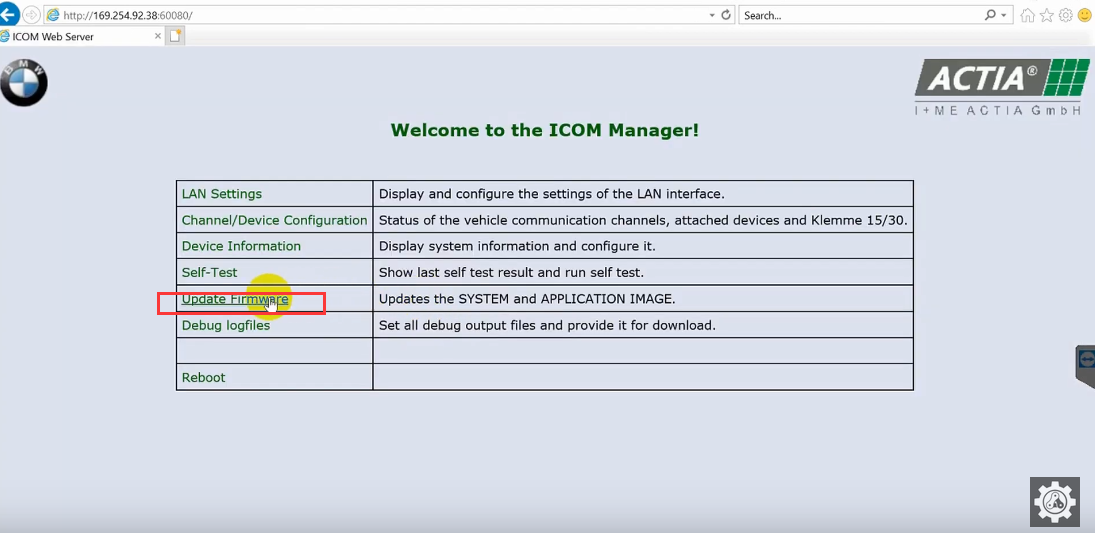
3. Click “Update Firmware”,you will see the ICOM firmware( ICOM NEXT Firmware) version information.
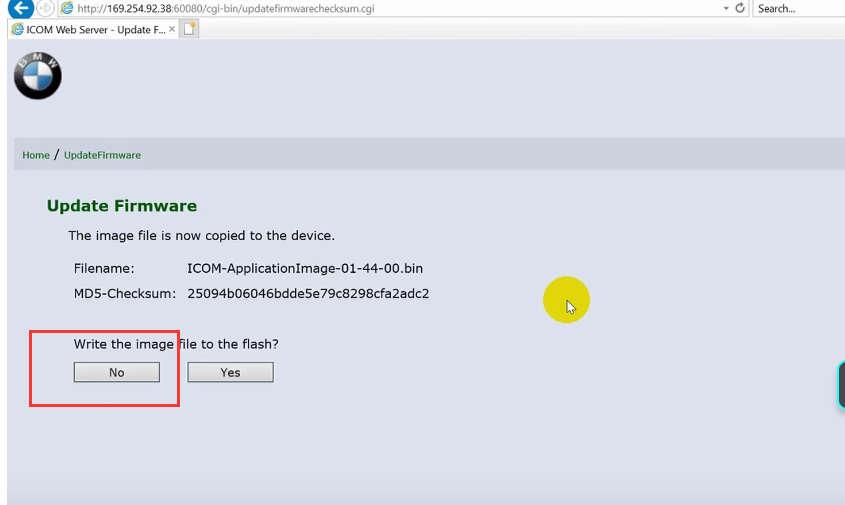
4. choose “ICOM-BootImage-01-26-00c.bin”, setting “image type” to “SYSTEM”,and then click “Send the file”. (You can find the update files on the desktop folder name “TOOLs”
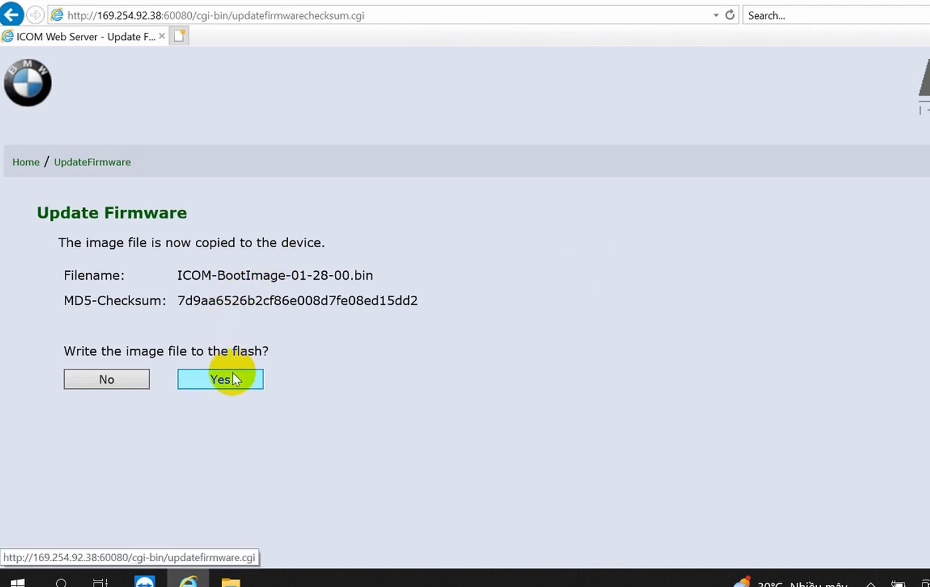
5. When it prompt out “Write the image file to the flash?”,click “Yes”,the ICOM led will be red color.
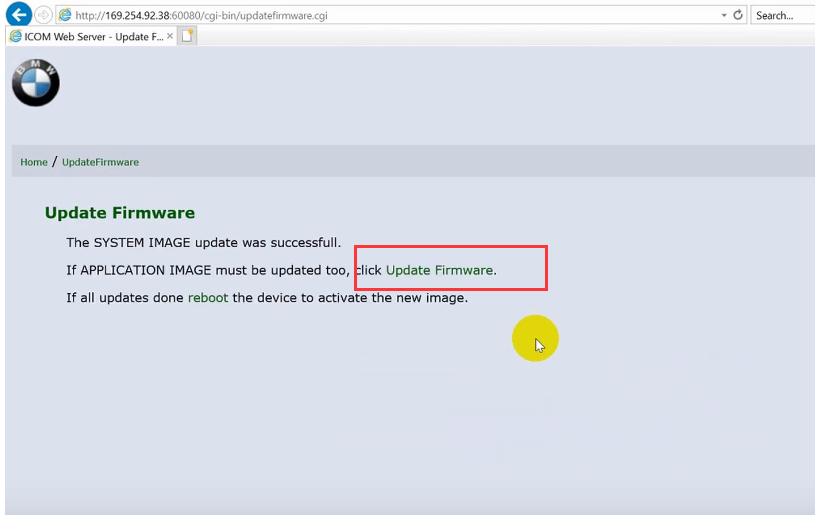
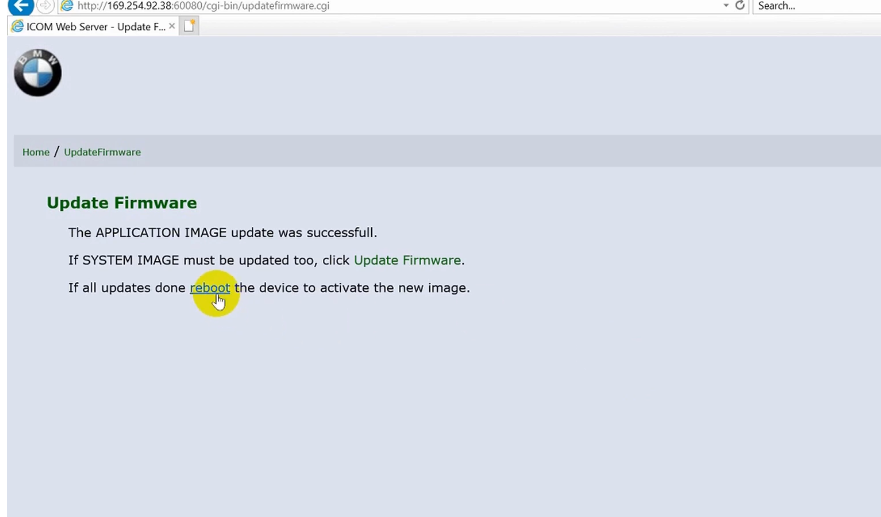
6. when it prompt out “The SYSTEM IMAGE update was successful”,click “Update Firmware”.
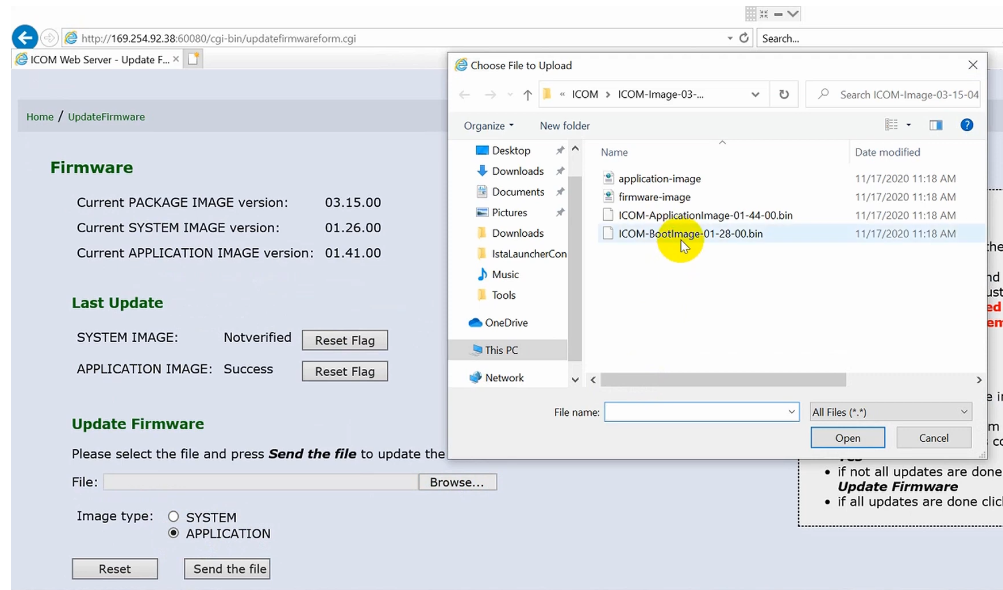
7. choose “ICOM-ApplicationImage-01-41-02c.bin”, setting” image type” to “APPLICATION”,and then click “Send the file”, it will take some minutes. (You can find the update files on the desktop folder name “TOOLs”
How-to-Upgrade-bmw-icom-firmware-update-12
8. When it prompt out “Write the image file to the flash?”,click “Yes”,the ICOM led will flash red again.
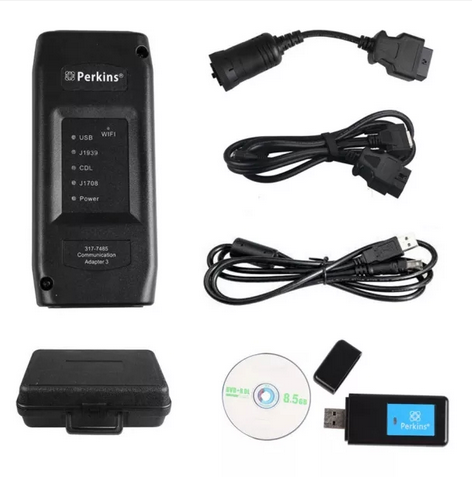
End of Support for Windows 8 The service tool has ended support for Windows 8. If you have windows 7 or 8/8.1 we can offer you the previous version of Perkins EST 2020A, which is compatible with both versions.
Microsoft® Windows™ 11 Compatibility Service tool testing has been performed and the service tool is compatible with Windows 11.
Configuration Group Headings on ECM Replacement Feature In order to help the user find ECM replacement configuration items easier, configuration items in the ECM Replacement, Fleet Configuration and Product ECM features are now grouped under their group sub-headings, as is done in the main configuration feature.
Calibration Images Images attached to calibration instructions will no longer need to be opened manually to be viewed by a technician. The service tool will now have split user interface windows for calibrations that display pictures. This will allow the technician to see the images without having to navigate away from the instructions. Images may be opened into individual windows and resized for better clarity. The user interface for calibrations that do not display pictures will remain unchanged.
Available subscriptions:
CLS00001 CLAAS Standalone Comet/Flash PERK5007 Customer JLCG2109 – Genset Only PERK5008 – Internal CMFG0612 – Engine Only TIPS2004 – Full Support EERE2001 Comet Factory Build for Perkins
To work with a diagnostic program Perkins EST 2020A needs a laptop computer with any USB or serial port and Windows 2000 or XP. Program Perkins EST quite demanding on CPU; hence, the slower the processor, the slower the program will work.
Electronic service tool Perkins EST 2020A includes the following changes: 1) WinFlash Screen changes – the WinFlash screen has been updated for improved usability. 2) New Help System – in this system, existing content has been significantly updated, and new content has been added to provide information and instruction on new features. 3) Snapshot Updates – the Snapshot feature now allows users to compare data points and to change the colors on the graph. 4) Time Mode Display Options for Data Log – “Time Mode” button is now available on the Data Log screen. Clicking this button allows users to toggle the display of the graph between the PC Clock Time (HH:MM:SS) and the time that elapsed while the data was being logged. 5) Trainer Enhancements – the following change was made to coach applications: application WinFlash has been added.
Perkins EST Support Languages: English,Chinese,Danish,French,German,Italian,Portuguese,Spanish
If you want to know more, please click:https://www.autonumen.com/goods-4431-Perkins-EST-Interface.html
Here is the step-by-step instruction on clear radio theftlock for GM (GM, SAAB. OPEL SUZUKI. ISUZU and HOLDEN) models with GM Tech 2 scan tool by AUTONUMEN.
GM Tech2 highlights: 1. Multi-languages available, different software version for different car models, detail information, you can check the software list in below description 2. Update via 32MB Card, you are offered to buy the newest update card alone 3. Support Car Models: GM, SAAB, Opel, Suzuki, Isuzu, Holden(from 1992 to 2013) 4. Best diagnose and program tool for GM with TIS2000, the TIS2000 CD support programming for GM cars before year 2007 5 This Tech2(GM Tech 2 Scanner) come with Carton Package, this will help you much in shipping cost and tax
Tech II Theft-lock procedure: Well setup CANDI module with Tech 2 main unit connect Tech2 scanner with vehicle 1.Select “Diagnostics” at the Main Menu screen 2.At the ‘Vehicle Identification” screen, select the following options: -Model Year>>(radio came from an 04 Escalade or whatever) -LD Trk, MPV, Incomplete; 3.Select “Bod/f at the “System Selection” Menu screen 4.At the ‘Vehicle Identification” screen, select the following: -Appropriate model -Appropriate Air Conditioning -Navigation Radio 5.Select “Navigation Radio” at the “Body” screen 6.Select “Special Functions” at the “Radio” screen 7.Select ‘VIN Relearn” at the “Special Functions” screen 8.At the JVIN Relearn” screen, the Professional Diagnostic Tools Tech2 will display “Do you want to clear radio theft information?*’ 9.To begin clearing, press the soft touch key on the top right of the scan tool. The scan tool will display “Clearing Radio Theft in Progress.” 10.Press “EXIT” on the scan tool and cycle the ignition.
NOTE: 1 The radio theft will learn the VIN. Without learning the VIN, the radio will display a locked message (LOC or LOCKED). 2. Another way is to see if the sound works by installing the radio, and not turning the key to ON, just ACC. that will work the radio for a test.
If you want to learn more about the GM Scan Tool ,you can contact with us : Service@autonumen.com ,or research on our store directly : https://www.autonumen.com .
What is JPRO Noregon Commercial Fleet Diagnostics? JPRO Noregon Commercial Fleet Diagnostics is a OEM diagnostic software for most comprehensive and power for all markets,all models.It provide a complete & unparalleled diagnostic service & repair solution with bi-directional functionality. Displays all vehicle faults, gives the user the ability to clear faults,provides key data points of interest to the technician, and allows the tech to quickly and easily toggle between all of the critical elements of each system. Record data into log files for playback, view and chart engine parameters, print reports and launch OEM software and troubleshooting guides with the click of a button. Ability to run diagnostic tests on medium duty commercial vehicles.
JPRO Noregon Commercial Fleet Diagnostics Functions: Diagnostic and vehicle information Re-programming Parameter adjustments …
JPRO Noregon Commercial Fleet Diagnostics Features: 1.Includes Heavy-Duty Modules: Mack, Volvo, Cummins, Detroit Diesel, International & PACCAR 2.Includes Medium-Duty Modules: Ford, GM, Isuzu & Sprinter 3.Bi-Directional Controls – Perform parameter changes (Mack & Volvo), DPF Regens (Mack, Volvo, Cummins, Detroit Diesel, International & PACCAR) & bi-directional tests with proprietary data & faults 4.OE Level Fault Code Information – Display over 99% of Heavy-Duty & Medium-Duty fault codes with detailed OEM level component and trailer descriptions 5.Fault Management – Clears faults and diagnoses all vehicle components in a single, easy to use application 6.Vehicle Reporting – View and print log files, including: Vehicle Health, Trip Reports & LOV Reports 7.Store & Save Data – Record data log files for playback at a later time, even away from the truck 8.Total Vehicle Health Status – See the entire vehicle in one pass on one screen + Up-to-Date – Provides 99% coverage of all heavy-duty truck DTCs through 2020 JPRO Professional Diagnostic Basic Coverage includes the ability to read & clear codes on the following list. You can also view all live data and perform basic diagnostics.
Body and Chassis: Bluebird, Ford, Freightliner, GM, International, Kenworth, Mack, Peterbilt, Sprinter, Sterling, Thomas Built, Volvo, and Western Star Engines: CAT, Cummins, Detroit, Ford, GM, International, Mack, Mercedes, PACCAR MX, Sprinter, Volvo ABS: Bendix, Ford, GM, Haldex, Sprinter, Wabash, WABCO
Transmission: Allison, Detroit, Eaton, Ford, GM, Mack, Sprinter, Volvo, ZF Cummins – Bi-directional support for the following: Cylinder cut-out for EPA 2002 to Current (ISB, ISC, ISL, ISM, & ISX) DPF Stationary Regen for EPA 2007 to Current (ISB, ISC, ISL, ISM, ISX) Trip Reset for EPA 2007 to Current (All ECUs) Aftertreatment reset for EPA 2007 to Current (All ECUs) Fuel Injector Reset for EPA 2013 to Current (All ECUs) Fuel Leakage Test for EPA10 to Current Fuel Injector Calibration EPA 2007 & EPA 2010 (All ECUs) VGT Actuator Installation & Calibration EPA 2010 to Current VGT Hysteris Test for EPA 2010 to Current DEF Doser Pump Override for EPA 2010 to Current Change road speed, cruise speed, & idle shut down timer for EPA 2007 to Current DEF System Leak Test (EPA 10 ISB/ISC/ISL/ISX & EPA 13 ISB/ISL/ISX)
Detroit Diesel – Bi-directional support for the following: Cylinder cut-out for 2000 to 2014 DPF Service Regen for EPA 2007 to Current SCR System Output Component Tests for EPA 2010 to 2013 SCR ADS Self Check for EPA2013 to Current DPF Ash Accumulator Reset for EPA 2010 to Current Idle Shut Down Timer EPA 2010 to Current Cruise Speed Limit Changes for EPA 2010 to Current Road Speed Limit Changes for EPA 2010 to Current DEF Quantity Test for EPA 2010 to Current Mack & Volvo – Bi-directional support for EPA 2007 to Current: Cylinder cut-out DPF Stationary Regeneration DPF System Reset Learned data reset Setting parameters (Cruise min/max, speed limits, idle shut-down times, and enable/disable cruise) Trip reports & life of vehicle reports (Only Volvo 2012 & Newer and Mack 20007 & Newer) Enable/Disable Driver Cruise Control EGR Function Test (EPA 2013 to Current) VGT Function Test (EPA 2013 to Current) VGT Monitor Test (EPA 2013 to Current) DEF Pressure System Test (EPA 2013 to Current)
International – Bi-directional support for EPA 2007 to Current: Cylinder Cut Out Test (All MaxxForce & N-Series Engines) DPF Stationary Regeneration Aftertreatment Reset for EPA 2007 & 2010 MaxxForce 11/13 DOC/DPF Replacement for EPA 2013 N-Series Engines KOER Standard Test for all MaxxForce and N9/N10 Engines SCR Faults Reset for EPA 2013 N-Series Engines Fuel Shutoff Valve for EPA 2010 MaxxForce 11/13 Fuel Doser Actuator for EPA 2010 MaxxForce 11/13 ETV Position Actuator for EPA 2010 MaxxForce 11/13 and N13 SCR Engines EGR Position Actuator for EPA 2010 MaxxForce 11/13 and N13 SCR Engines Air Management Test for all MaxxForce, N9, and N13 SCR Engines DEF Doser Pump Override Test for N9, N10, & N13 SCR Engines KOER Injector Tests for all MaxxForce & N9/N10 Engines Fuel Pressure Adaption Reset (EPA 2007 to Current MaxxForce 7) Idle Shutdown Time (EPA 2007 & 2010 MaxxForce 7, DT, 9, 10, 11, 13, & 15) Road & Cruise Speed (EPA 2007 & 2010 MaxxForce 7, DT, 9, 10, 11, 13, & 15) PACCAR MX Engines (Does not cover GHG17 Engines) Automated Cylinder Performance Test DPF Service Regen Install a New/Cleaned DPF Filter command DEF Pressure System Test (EPA 2013 & Newer)
Isuzu – Supports 2008-2021 Isuzu trucks with either the 5.2L (4HK1) or 3.0L (4JJ1) engine in both North America Cylinder Cut Out DPF Service Regen
Ford – Supports 2004 to 2021 Ford models F-Series, E-Series, Transit Connect, and Transit Vehicles Gives users the ability to read and clear faults, read freeze frames, read sensor data, and display emission test results Enables users to run diagnostic testson components such as Key On Engine Off (KOEO) On Demand Self Test
GM – Supports 2002 to 2021 GM models GMC & Chevy 1500, 2500, 3500, GMC Express & Chevy Savana, all GM Medium Duty Vehicles Gives users the ability to read and clear faults, read freeze frames, read sensor data, and display emission test results Supports cylinder cut-outs on all diesel & gasoline engines on years 2002 to 2018 (Except for CAT engines) Tests for 2010 to 2012 Express/Savana with 6.0L gas engines DPF Service Regen for 2010 to 2018 with 6.6L, 2017 GMC Savana, and Chevy Express with 2.8L
Sprinter – Supports 2007 to 2021 Sprinter vehicles Sprinter module gives users the ability to read and clear faults, rear sensor data, and display emission test results Supports EPA 2007 & newer engine tests: Cylinder cut-out, compression test, DPF regen, injector quantity adjustment, mass air flow sensor initialization, and initialize rail pressure Supports instrument clustomer (2007-2021) tests: Oil change reset, display dimmer test routine, gauge sweep test, LCD display test routine, and speaker test routine Supports tire pressure monitor – Tire pressure sensor test WABCO ABS ABS Lamp Test Wheel Speed Chart Test Wheel Speed Window Test Bendix ABS ABS Lamp Test Wheel Speed Chart Test Wheel Speed Window Test
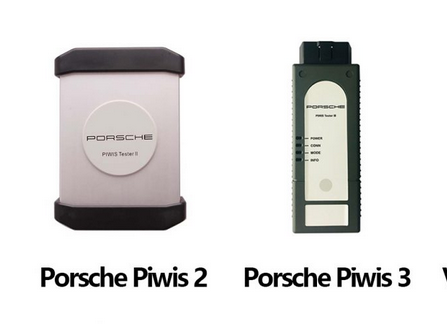
First of all, aPiwis II and a Piwis III do the same things, only the three can do newer cars, 2018 and on, where as the two is limited to the 2017 and earlier models. The III is easier to use but is more technically challenging to clone since it seeks a signal from Porsche to authorize the VCI (the thing you plug into the car’s diagnostic port) The Chinese who sell the clones, created their own server to clone and send out those signals, then modified the VCI firmware to look for the Chinese signal instead of the Porsche signal.
My background, I do not work for Porsche or have I ever used a dealer unit. What I learned, I learned from playing with the units. I had purchased a flooded 2013 Panamera, and I wound up changing ever module in the car except two. I purchased new and used modules, and used the PIWIS 2, then the three to code those modules to my VIN. As many people noted here, there are plenty of other devices that you can purchase to reset your service interval, change your battery or set the parking brake to the service position. What those devices can’t do that the PIWIS can do is code modules to your car, change the way those modules operate, run some diagnostic tests and see the output and input of almost every sensor and button in the car.
You purchased your tester, now what.
Some terms. VAL Vehicle Analysis LOG. When your tester first connects to the car, it reads the state of all modules and records all the faults in a log. This log is then tagged by you either as before repair, during repair or after. These logs serve as proof for Porsche that the dealer performed work for service payment. They don’t serve a lot of value for individuals, other than document all your errors for offline. I found them somewhat useful as a milestone as my car had over 150 faults when I began and I could see my progress looking through vals as I did repairs. VALS want to be uploaded so they look to Porsche servers to upload but since yours doesn’t have a PNN account, it can’t connect.
Programming or Coding. Porsche uses both but really doesn’t seem to distinguish between them. You cannot update the firmware of the modules, you simple program it to your car. You can add or change the VIN in the modules. For modules to work in yor car, they must have the VIN programmed in them. Buying a new module from Porsche and sticking it in, won’t work because the module needs a VIN programmed in it to talk to the other modules in the car. Beyond that, you need to program the module to your options. For example, the rear door module on a panamera uses the same module for the right and the left doors. If you place a new module in the right door, the window operates in reverse. Programming it, tells the module, it is located in a right door and reverses the up/down. . There is auto and manual programming, more on that in a another post.
Initial set up and overview When you first connect to your car, you must have the car on, but not running. Connect the VCI to the car and the laptop, turn on the car then start the diagnostic program on the laptop. The PIWIS III will auto determine the model of the car, the PIWIS II requires you to select the model when starting the diagnostic program. I will add pictures at times when asked. Keep in mind I sold my PIWIS II, so I can only add pictures of the three. if you are not connected to a car, both versions of the PIWIS will offer simulation mode which is a good way to get familiar with the unit without messing up your car.
When you first enter the diagnostic mode, you are shown a list of all modules in your car. In engineering mode, all modules are shown, even those not in your car so make sure you are in Production mode. If everything is in English you are in production mode. If the module names are in German, you are in engineering mode. Note there is a language selection prior to entering the diagnostic program for those who seek other languages. You are on the overview tab and there are other tabs, but on the module listing page, you do not want to enter any of those other tabs, They are used when looking at one module. The first thing I recommend people do is hit the button marked add. menu at the bottom.(F7) From here you can run read all fault memories. Run that and don’t run the other options as many require a connection and a Porsche account. Don’t get too concerned with your faults, many show up simply from a low voltage situation. Try erasing them all first. If they all disappear, that’s good, any that stay on will require investigation. Please note that some will disappear because the module is not active. If you run the car and then note the same faults reoccur, you should investigate them.
Once you have cleared all the faults, you should go back to the overview screen which shows all the modules and select any module you want to investigate then hit next. That will take you to that specific module where you can now use the other tabs across the top to show the module information, read any inputs or outputs and do any repairs that may be listed. To keep this initial post short, I will post specific how to’s in separate posts. I hope others will do the same.
Finally, there are certain modules that you cannot replace. These modules hold the key code information and must be programed by the dealer. They are the engine module, the Front and rear Body control modules, the Steering ELV module (few people have this module) I read somewhere that the airbag module is also on this list. I cannot confirm this as that is one of the only modules that is original in my car and still worked. While you cannot replace them, you can certainly do repairs, or change options in some of them. You can use them to diagnose problems, you just can’t replace them entirely.
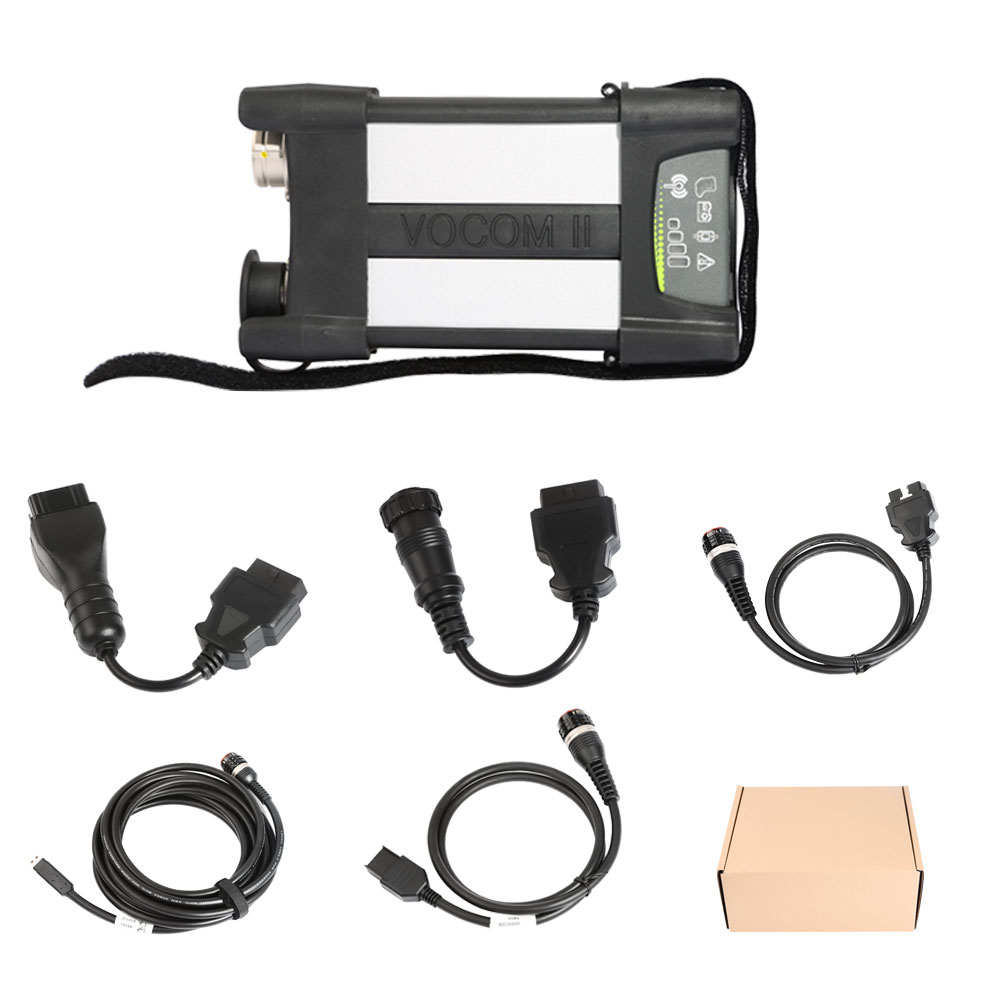
Premium Tech Tool vocom developer tool: 1. Dealer tool to access and program parameters in Level2 and Level3 without connecting to central severs; 2. Works with Tech Tool (VCADs Pro), Normal or Development mode, support 28 languages; 3. Support all brands and models supported by Tech Tool (VCADs Pro 3.06); 4. Make programmable more than 11000 parameters; 5. Program speed limit, change chassis ID, disable immobilizer; 6. Change minimum/maximum values of parameters, for example: increase speed limit;
Premium Tech Tool (PTT) is an application for the Aftermarket, developed to support efficient service and diagnosis. Premium Tech Tool is available as a connected version or as an unconnected version. The unconnected version is called Premium Tech Tool Connectionless (PTTC) and that is that we offer. PTTC is used in workshops that do not have internet access, but both versions are referred to as PTT. PTT provides access to the Guided Diagnostics and VCADS.
Vocom Communication Unit is designed with focus on robustness and durability to withstand the tough workshop environment. ·Improved LED indicators ·Improved quality of cables ·Military standard on connectors ·Better liquid and dust ingress protectors ·Metal casing and rubber bumpers for better robustness Vocom Key Facts Parts no. for Vocom Cables Temperature Range: -40° – +85° (Wlan-20°- +65°) Protection Class: IP55 Shock Resistance: 2m RoHS Conformance: Yes Wlan: 802.11 b/g Dev2tool is the Dealer tool to access and program parameters in Level2 and Level3 without connecting to central severs; Works with Tech Tool (VCADs Pro), Normal or Development mode, support 28 languages; Support all brands and models supported by Tech Tool (VCADs Pro);Make programmable more than 11000 parameters. Program speed limit, change chassis ID, disable immobiliser; Change minimum/maximum values of parameters, for example:increase speed limit; The new rugged Communication Unit Vocom 88890300 for the tough workshop environment and field service.
Hey, what I’m going to do today is, teach you how to extract trouble codes using advanced tech tools, which is software for mac and volvo, not just pull trouble codes, but show you exactly how to fix them.
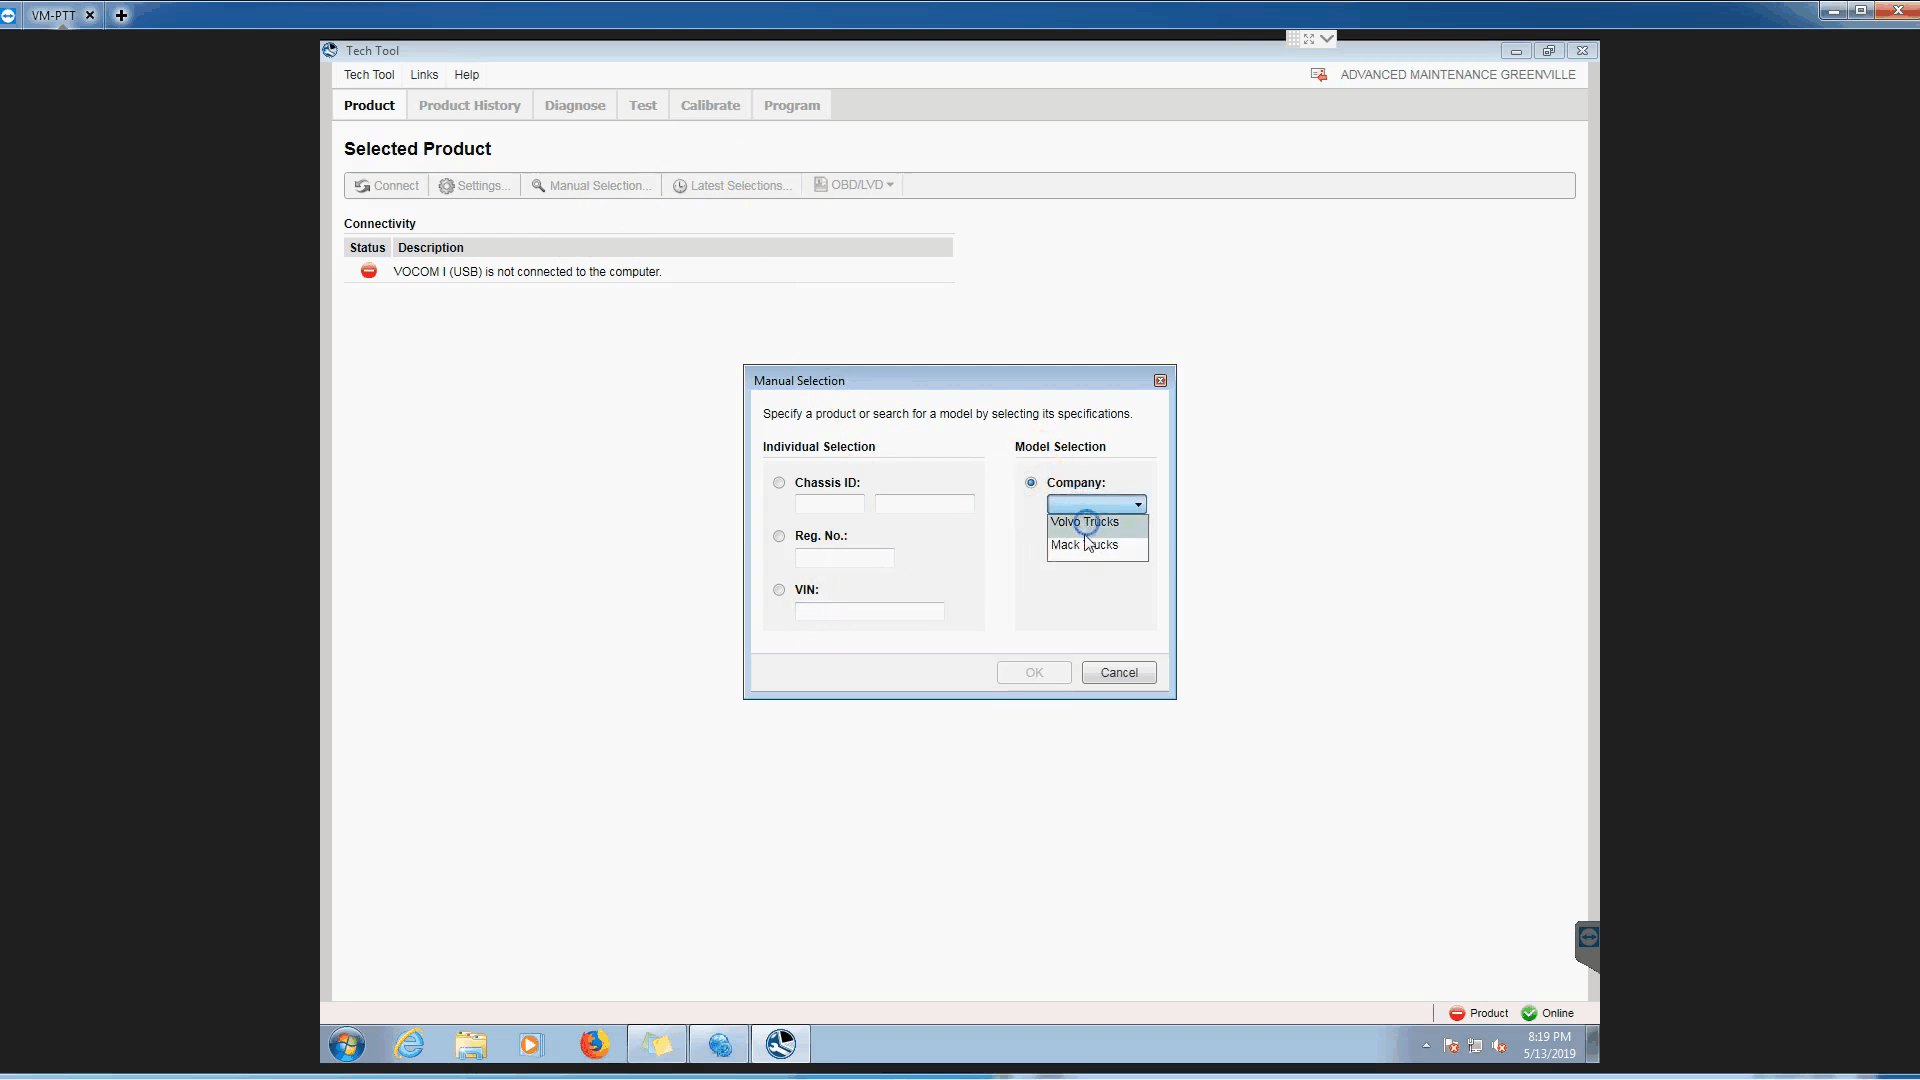
So, let’s go through some examples here: because a lot of people don’t know this right now, if your vin number is good, we’ll enter it in there. If you don’t have your vin number, you go here and choose your favorite Volvo truck and then choose what is the version or what year most people don’t know about this.
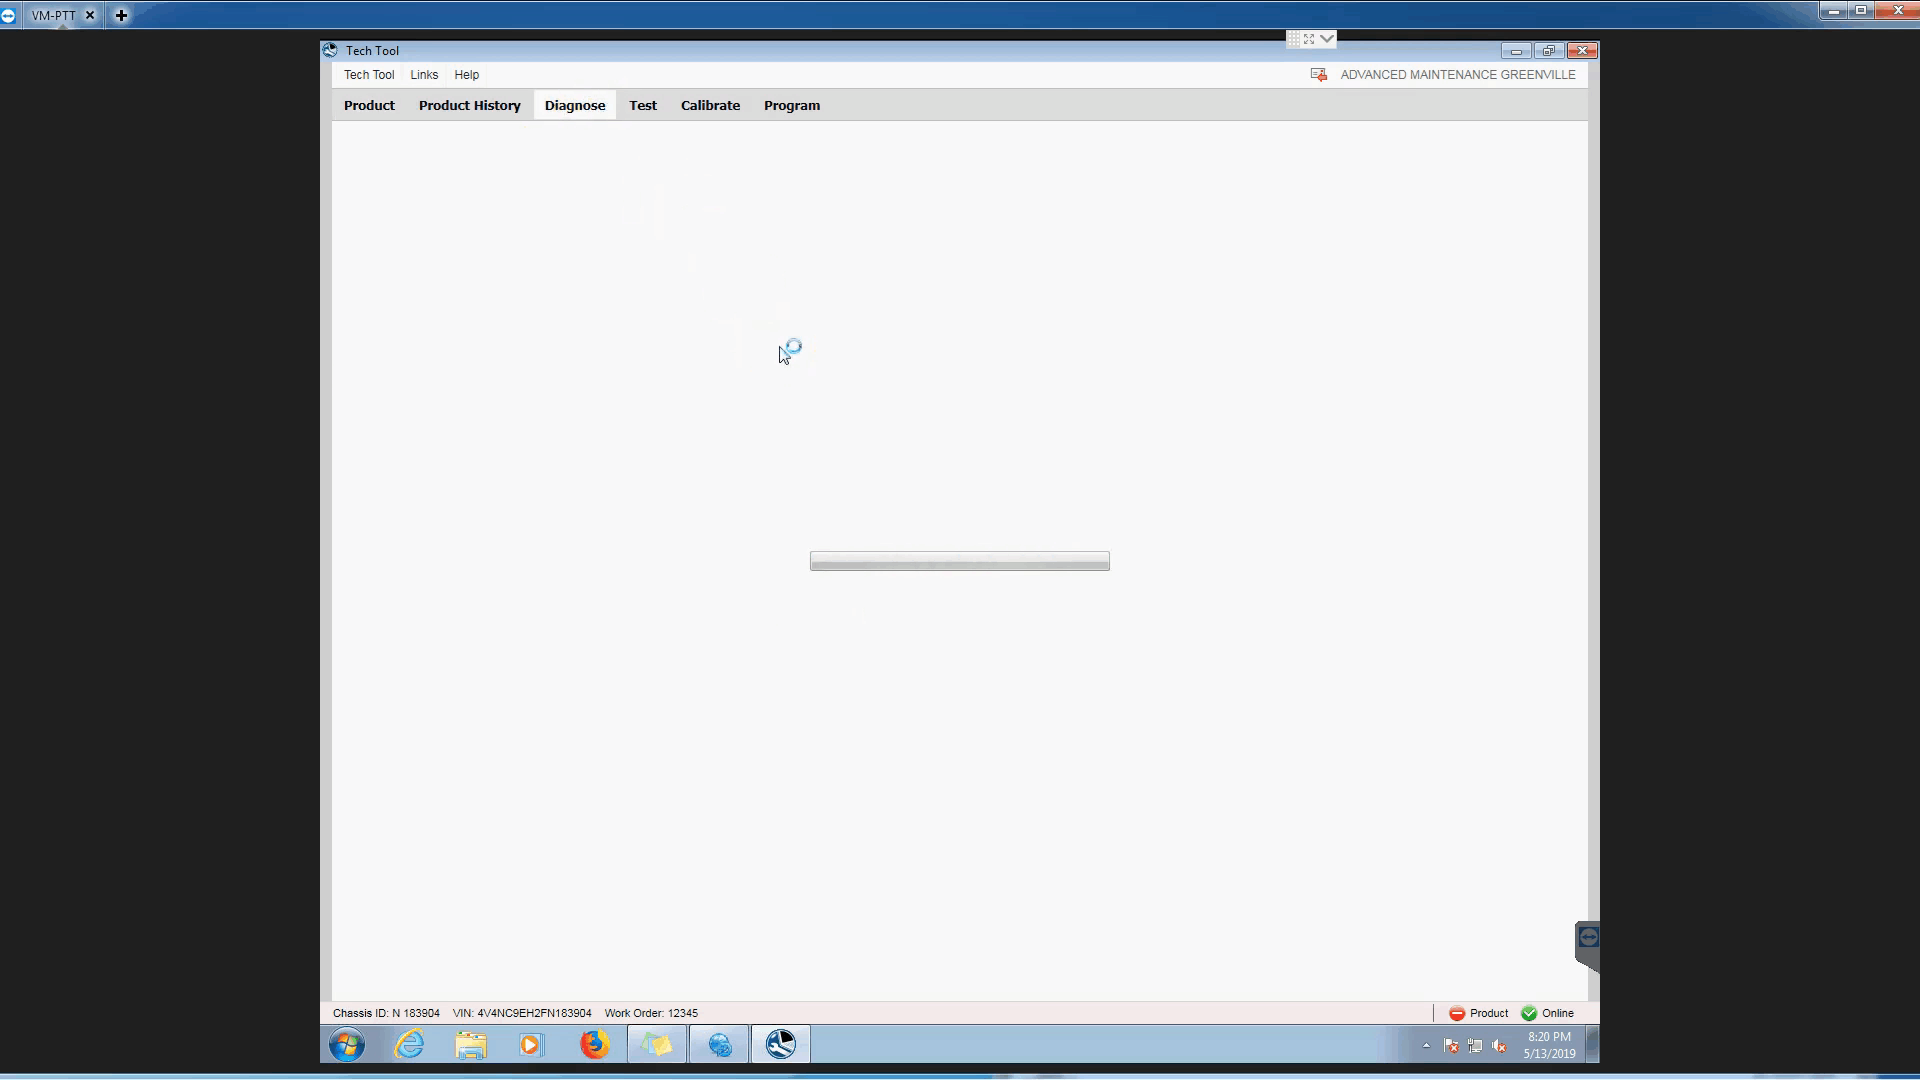
So I wouldn’t use this. Unless you really know what you’re doing, let’s get back to the vin number, let’s pop it, let’s play it, it’s going to take a little time here. You do need to have online access to use advanced technology tools. So let’s go ahead and do a new work order here, if we do it every time you connect to the vehicle with the tech tool. So this is on my virtual machine not actually connecting to anything I just tell the software I’m hooked on it.
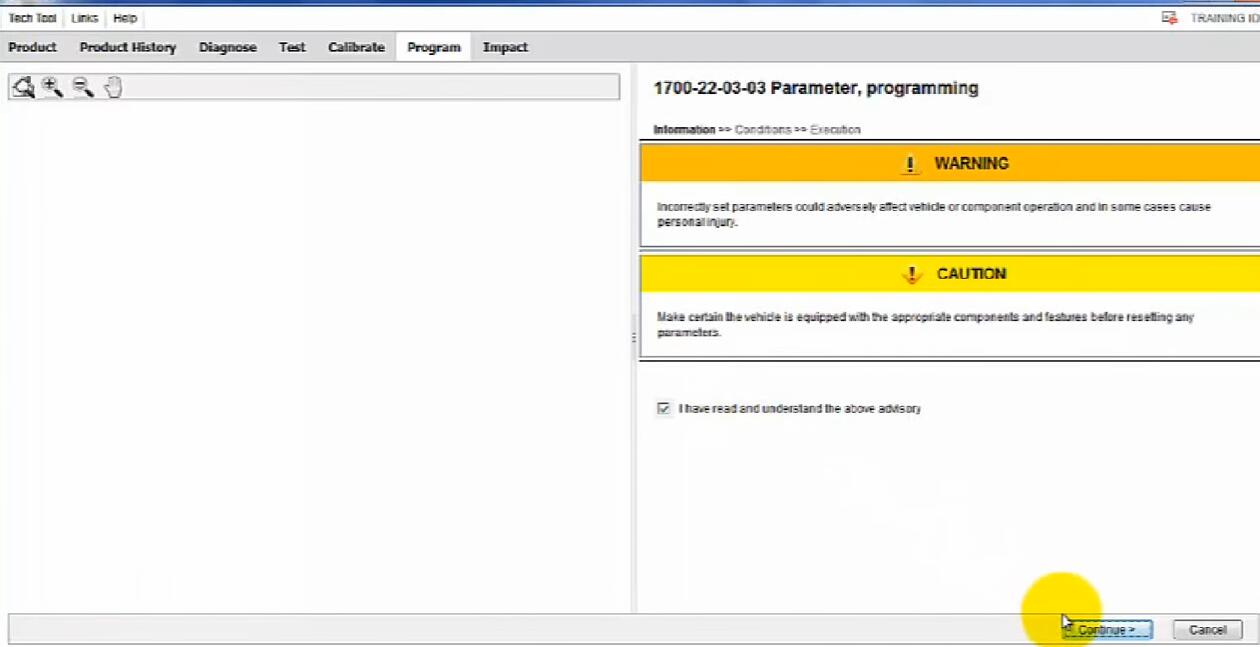
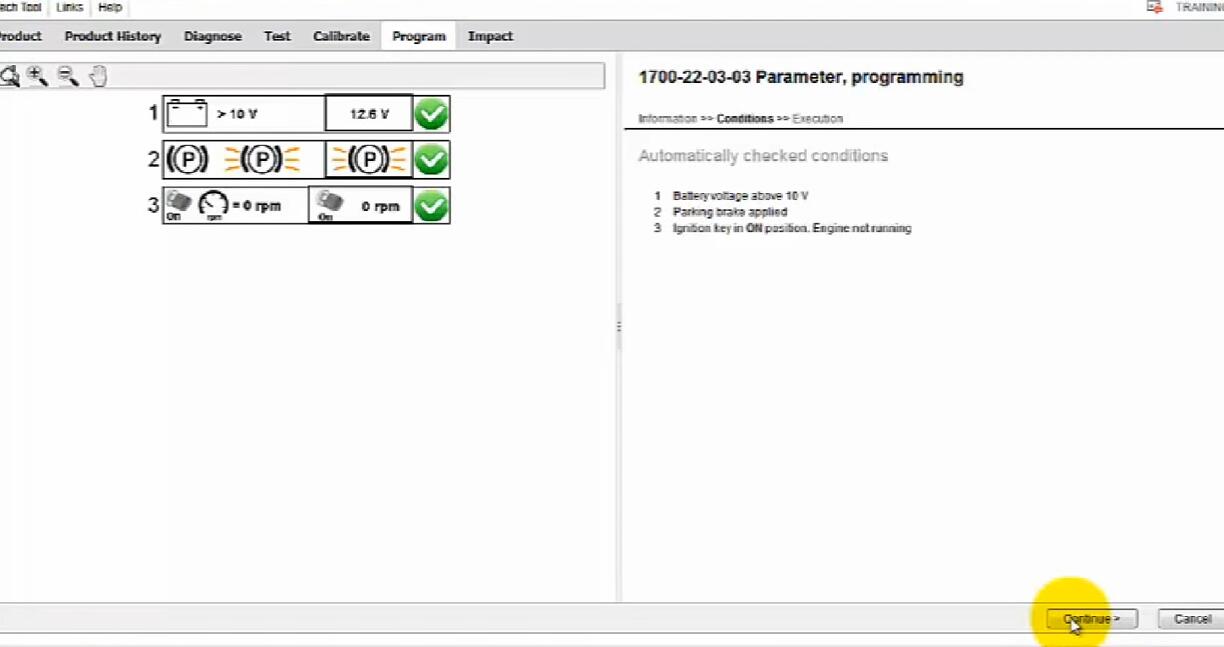
As you can see, it pulls information here and what emissions year and all that stuff. So what I’m going to do now is I’ll go over the diagnostics tab and once you go, this diagnostics tab or a test or a tab or a calibration or a program just expect it to take a good 30 45 seconds and let it do what it will do here Do.
It’s not super fast or fast. Our virtual machines, laptops, I’ve never seen one actually fly over this software. This is some very powerful software from technical tools. They use the same procedure for pretty much everything involved in their diagnosis across the planet. Vulva is huge global organization and why we’re doing so well, we’ll be back in a second.
So first of all, let’s go to the engine. Basically this is selecting the symptom, the right engine gearbox, the cruise control. All of these, you don’t even have to pick one to go here and go on, all it’s going to say now is: oh ok. This is your fault code, the problem you want to fix, we don’t have any because we’re not actually connected to anything, but we can simulate it.
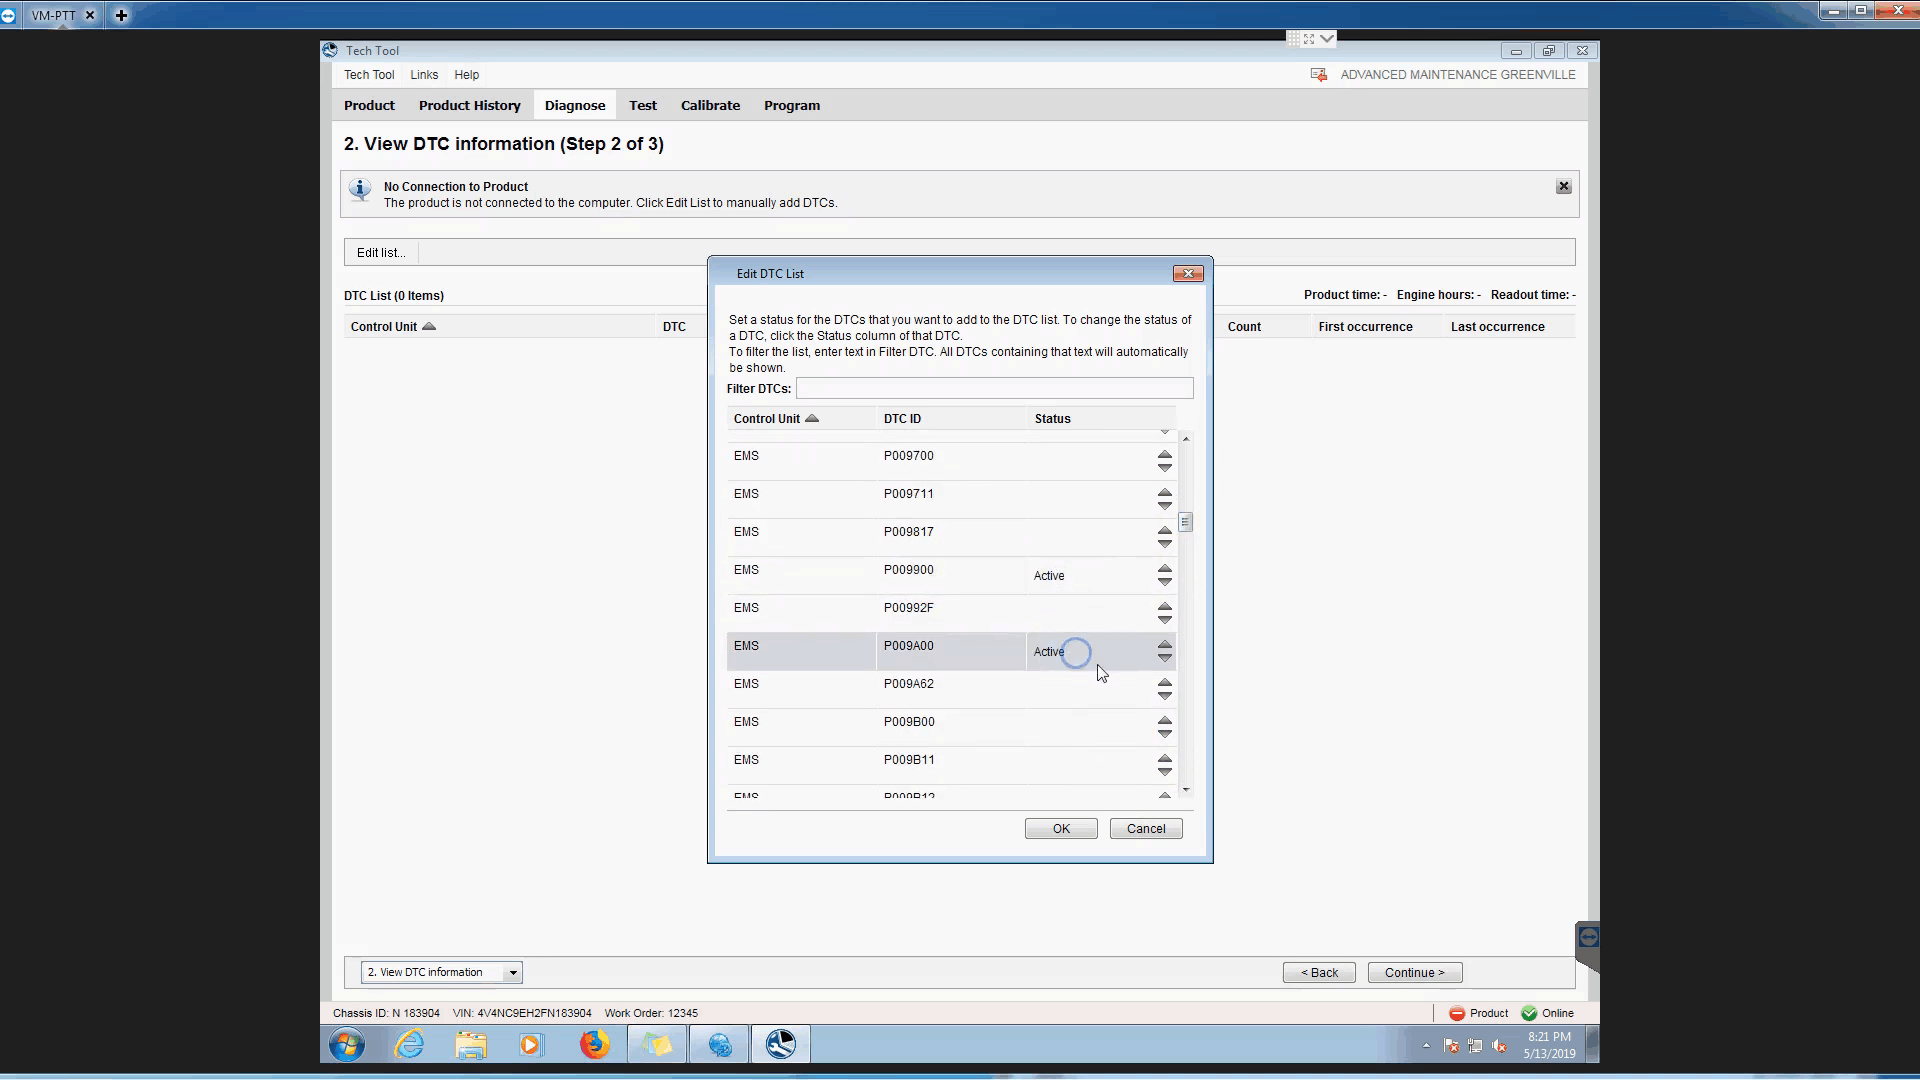
So let’s go ahead and edit the list, let’s pop up a list – this is what will – be a list of everyone’s own fault codes, that may exist on that car, and obviously you see a bunch of pee codes. I will tell you what modules I am just scroll down here you can see them. They are all here.
So remember your engine stuff. It’s acm and ems and all these others when you make fun of other mids, mid 140 and me a lot of them? These are your other separate, separate subsystems, so we just need classes to grab some random ones here and you can say, are they active? Are they inactive? Let’s activate that, let’s go grab a pair. Engine and I don’t know what these are. So hopefully we can get something out of it and that’s okay.
Let’s go grab a pair of more oops, too many clicks are a bit laggy. It’s ok!
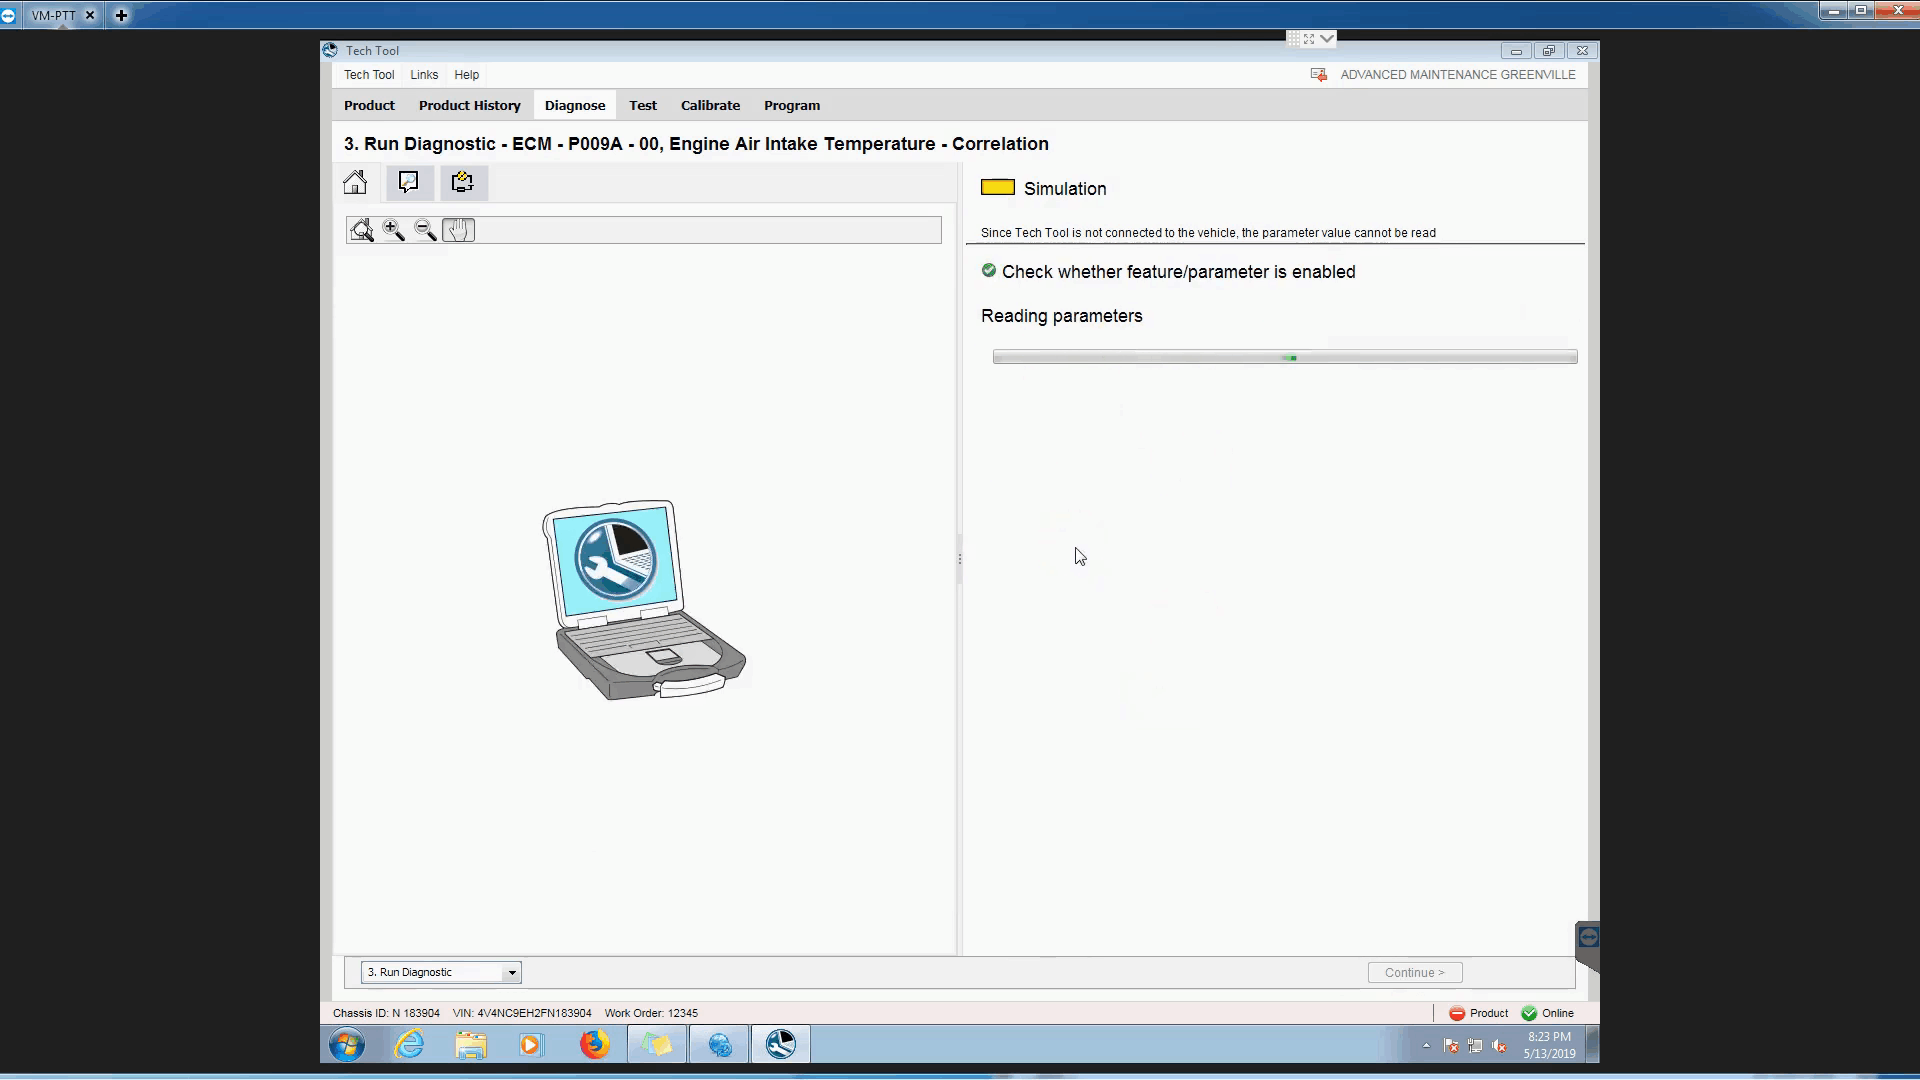
Well, now that we’ve made it, now I’m going to say: oh, here’s all the code you want to know more about. Let’s click on the first one and then click on it to continue, now it’s populated with all the information we need to pass that diagnostic code.
Again, don’t expect this to be a quick thing. You do need an active subscription to the tech tools we resell here via a decent laptop. Part of what you get when you buy from us is the ability to call our technical support department. We’ve got it’s good points, we’ve got actual diesel technicians, so we’re here to help you guys anyway, what you’re really going to do here is our code to give you some wiring diagrams or some info about it.
The selection system is here, basically, you hit start, and then again you’re down to a bunch of options here. So it’s going to say: Hey, here we go! Some possible leads for more information, click here and it will stay with you through everything. You gotta know about that and go on about that code, well, so it’s basically checking again and again, testing descriptions, features, testing possible causes for it.
So if we want to see the test description, just click on the test description and you can see the menu down here is changing. So now it’s saying: ok, I can go ahead and run the simulation. I can try again. Communication vehicle failure Runner, simulation. Let’s do that and it’ll just continue here. So obviously you’re doing more connections to simulate sewing these.
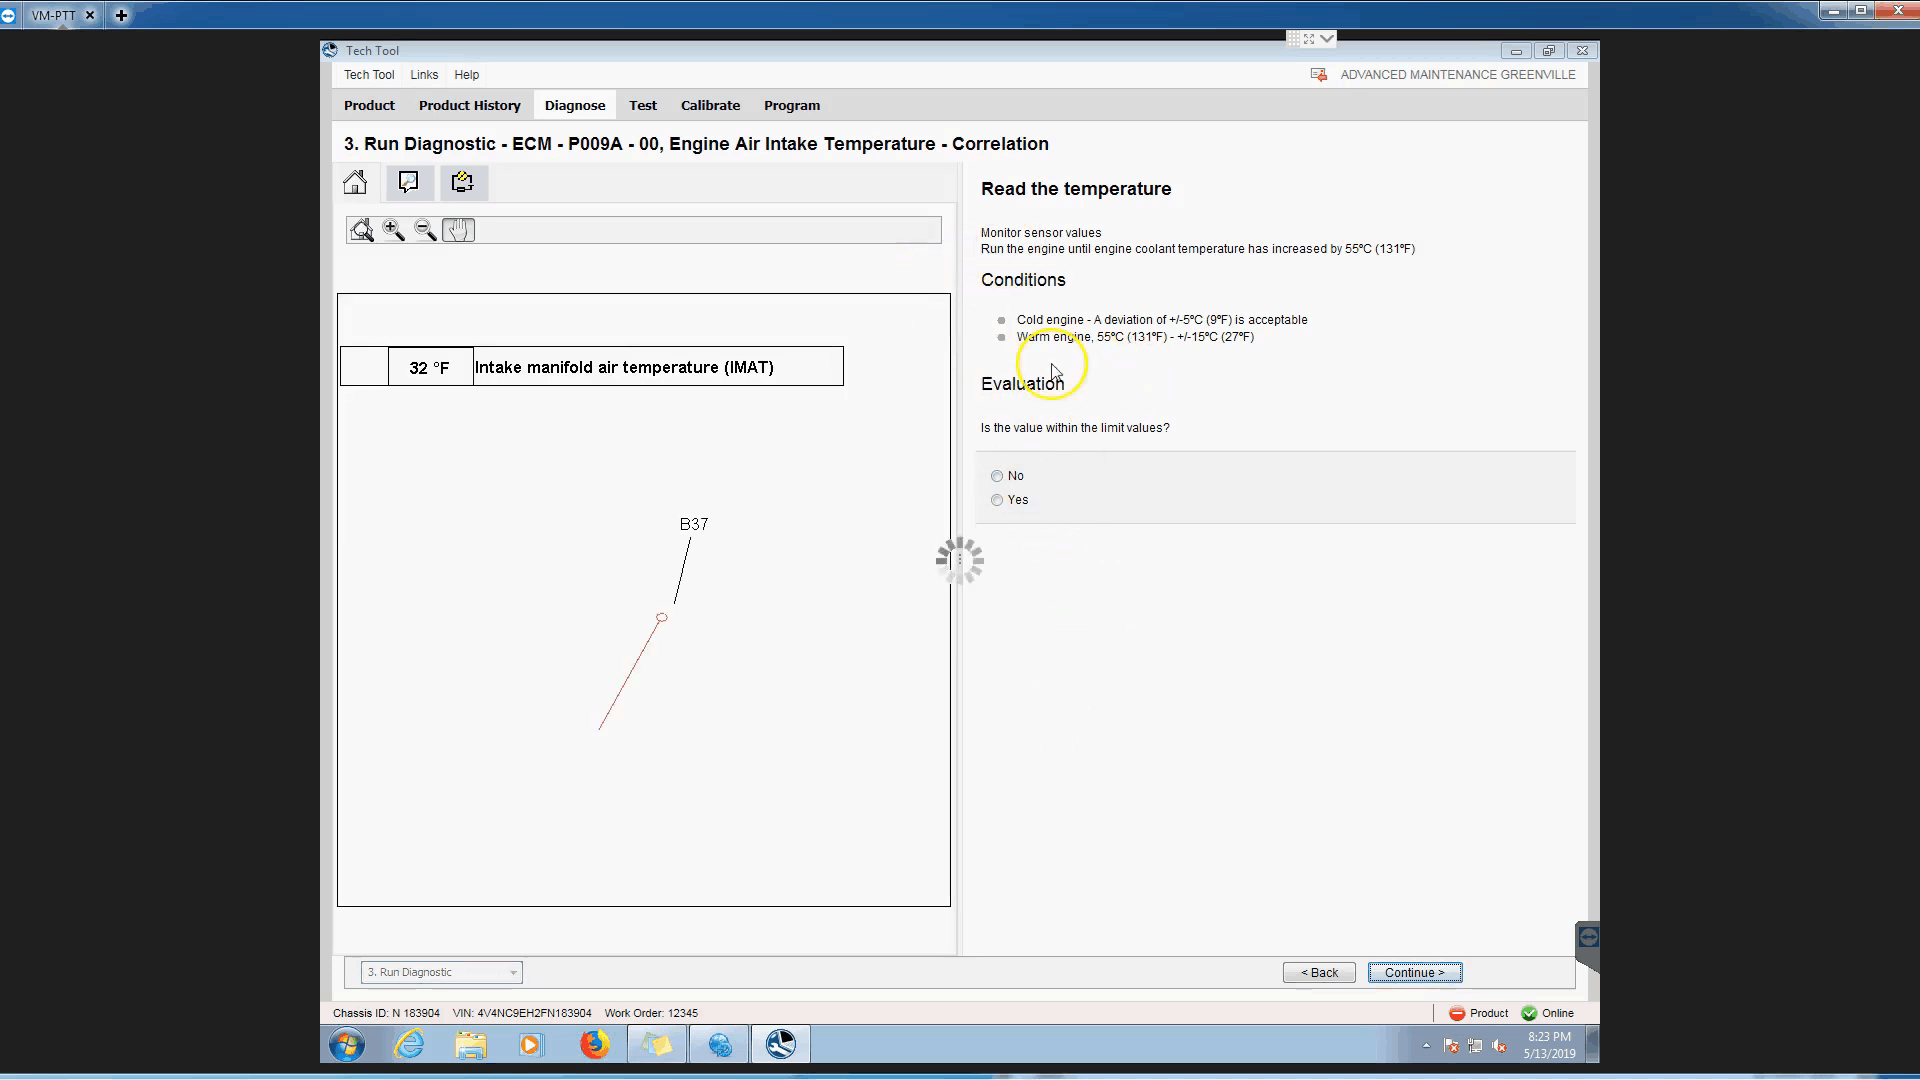
So far you just want to show you that everything is happening, so the set point should be minus 40 to minus 200, and we’ll just say: I guess: let’s leave it at 32 and we’ll continue traversing the troubleshooting tree with that.
It’ll take you where you want to go it’s ok so let’s walk all the way back so just put it behind the arrow me. Sorry, not quite the right way to get things done, menus menus and browse the whole thing.
Well, so on the last day, that’s what you did. We had to keep clicking here for all the info by the way of this thing, yes, by testing the limits, keep quitting. The diagnostics continue to work fine and now we’re starting over again.
We can hit back and go to that main menu. Again, where can we put the color code, so you have it. That’s how you extract diagnostic codes and Volvos on a mac, with advanced tech tools, instead of having to connect to a truck.
Thanks.
:: بازدید از این مطلب : 146
|
امتیاز مطلب : 2
|
تعداد امتیازدهندگان : 1
|
مجموع امتیاز : 1
تاریخ انتشار : چهار شنبه 16 شهريور 1401 |
نظرات ()